

Tendon-loading exercise, either eccentric heel drops or heavy slow resistance training, is the first-line, evidence-backed treatment for Achilles tendinopathy. If pain is too sharp to tolerate loading, isometric holds bridge the gap safely. Midportion pain and insertional pain need different exercise setups. Expect meaningful symptom change within weeks, but plan on three to six months for the tendon itself to remodel, and see a clinician if pain worsens or swelling develops.
TL;DR:
- Exercises should be tailored to the pain location, with midportion tendinopathy tolerating dorsiflexion exercises like heel drops below a step, while insertional tendinopathy requires limited-range, flat-ground loading to avoid compression.
- Isometric holds serve as a safe, pain-relieving bridge exercise when dynamic loading causes too much discomfort, with pain kept below a 4-5 out of 10 during and after the hold.
- The classic Alfredson eccentric heel-drop protocol, involving high repetitions, can be adapted to a do-as-tolerated approach to improve adherence without compromising outcomes.
- Heavy slow resistance training in the gym offers an equally effective alternative that typically results in better compliance due to shorter, more structured sessions.
- Progression depends on accurate pain monitoring, avoiding deep dorsiflexion stretches for insertional pain, integrating proximal strength, and carefully returning to sport with staged increases in load and intensity.
Where the pain sits on your Achilles determines almost everything about which exercises you should be doing. Get this wrong and you can aggravate an insertional problem with an exercise designed for a midportion one.
Midportion tendinopathy shows up as pain and thickening two to six centimeters above where the tendon attaches to the heel bone. Pinch the tendon between your thumb and finger at that spot. If it’s tender, swollen, or has a noticeable lump, that’s your midportion zone.
Insertional tendinopathy causes pain right where the tendon meets the calcaneus (heel bone), often with a bony bump you can feel or even see. Press directly on the back of the heel where the tendon inserts. Sharp, localized tenderness there points to insertional involvement rather than midportion.
The distinction matters because of two mechanical factors: dorsiflexion (the ankle bending upward, toward the shin) and compression at the bone-tendon junction.
The 2024 clinical practice guideline on Achilles tendinopathy treats tendon loading broadly as first-line care regardless of location, but the way you load has to change based on where your pain actually lives. Skipping this triage step is one of the most common reasons people feel like their rehab exercises are “not working” when the real problem is exercise selection.
Isometric holds are the right starting point when your Achilles hurts too much to tolerate dynamic loading like heel drops. An isometric contraction, where the muscle generates force without the joint moving, has a well-documented short-term analgesic effect on tendon pain, making it a practical bridge before you progress to eccentric or heavy slow resistance work.
The mechanism isn’t fully settled, but the clinical pattern is consistent: sustained, moderate-to-heavy isometric loading tends to reduce pain for a window of time afterward, which gives you a usable pain-free training window later in the day.
Here’s how to perform the two most useful variations:
Dosing is straightforward: hold for 30 to 45 seconds, rest for the same duration, and repeat for four or five rounds, once or twice daily. Load “to tolerance,” meaning you should feel firm tension and some discomfort but not a sharp increase in pain during or after the set.
Pro Tip: Rate your pain during the hold on a 0 to 10 scale. Staying at or below a 4 to 5 is generally an acceptable working range; anything higher means the load needs to come down, not the exercise abandoned entirely.
You’re ready to progress off isometrics and into eccentric or heavy slow resistance training once you can complete the hold protocol with pain consistently below that 4 to 5 threshold, and once next-morning stiffness has stopped climbing session to session. Most people spend anywhere from a few days to two weeks here before moving on, though high, unpredictable pain can justify staying longer.
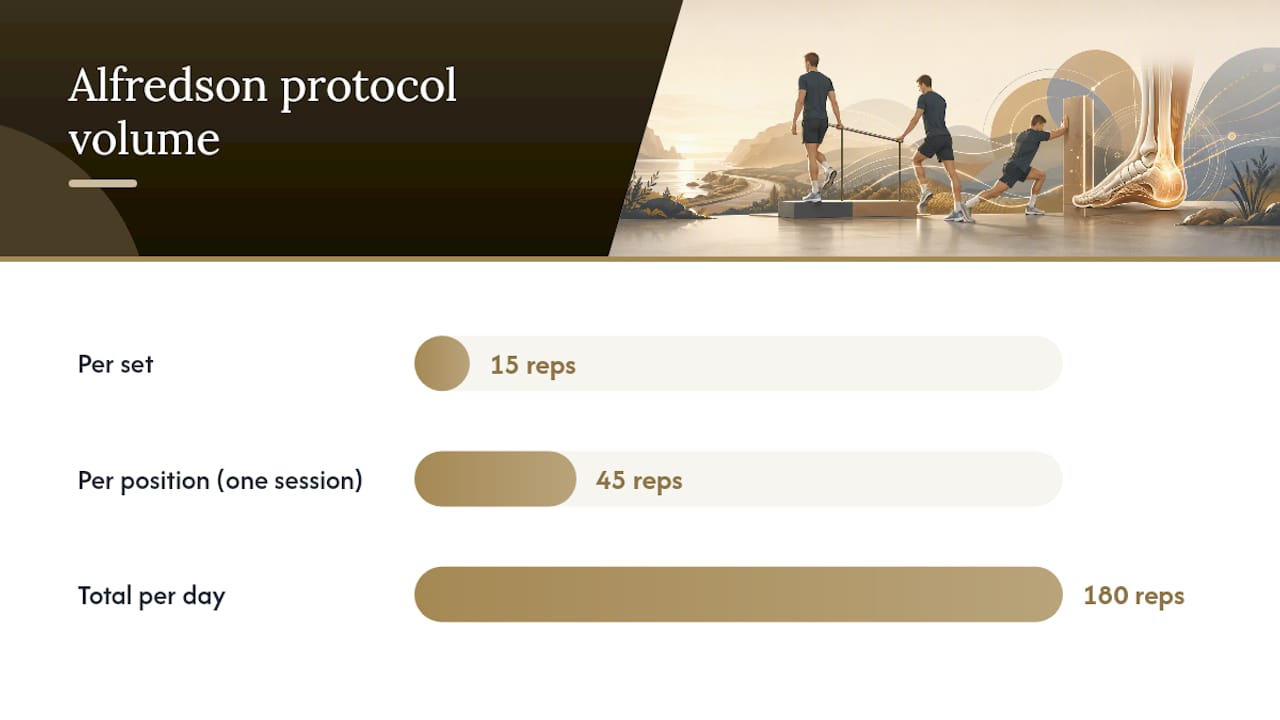
Eccentric heel drops, often called the Alfredson protocol after the physiotherapist who popularized it, remain one of the two evidence-backed foundations of Achilles tendinopathy rehab. The exercise emphasizes the lengthening phase of the calf muscle contraction, lowering under control rather than rising with effort, which appears to drive the tendon adaptation that reduces pain over time.
Setup: Stand on the edge of a step with your heels hanging off, balls of your feet on the step. Use a wall or railing for balance if needed.
Do this in two knee positions: straight-knee, which loads the gastrocnemius, and bent-knee (knee flexed roughly 20 to 30 degrees), which shifts more load onto the soleus. Interestingly, a biomechanical modeling study found that bending the knee during heel drops changes lower-limb kinematics and muscle lengths, but does not actually increase peak Achilles tendon load. In plain terms, the bent-knee variant isn’t a “harder” version aimed at more tendon stimulus. It’s a way to vary the emphasis across the calf complex, not a way to force greater loading.
The original protocol: The classic Alfredson program prescribes 3 sets of 15 reps, in both straight-knee and bent-knee positions, twice a day, seven days a week. That works out to a high number of repetitions daily as originally prescribed. It’s a demanding volume, and it was designed that way deliberately.
That volume is also the protocol’s biggest practical weakness. A randomized trial published in JOSPT compared the standard high-volume Alfredson dosing against a “do-as-tolerated” version, where patients performed the same exercises but adjusted sets, reps, and frequency based on their own pain response rather than hitting a fixed 180-rep quota. The result: no significant difference in outcomes at six weeks. Patients following the flexible version got essentially the same benefit without forcing themselves through a rigid, often painful daily grind.
That finding matters more than it might seem. Rehab programs fail most often not because the exercise is wrong, but because people stop doing them. If 180 daily reps feels unsustainable, a do-as-tolerated approach, built around the same movement pattern but flexed to your actual pain and schedule, is a legitimate, evidence-supported alternative rather than a compromise.
A few practical notes on execution:
Most people run this protocol for 12 weeks before reassessing, matching the timeline used in most of the underlying research.
Heavy slow resistance training, or HSR, is a legitimate substitute for eccentric heel drops, not a lesser one. Where the Alfredson protocol isolates the eccentric (lengthening) phase, HSR loads both the concentric and eccentric phases of the movement, using heavier external resistance and a deliberately slow tempo, typically a three-second lift and three-second lower.
Randomized trials comparing the two approaches head-to-head found no clinically relevant difference in outcomes between eccentric training and HSR at 12 and 52 weeks. The meaningful difference between them isn’t effectiveness. It’s adherence: HSR programs, done in a gym with machines and progressive weight increases, tend to report higher patient compliance than the high-repetition Alfredson protocol, largely because sessions are shorter and the loading feels more like conventional strength training.
Core HSR exercises:
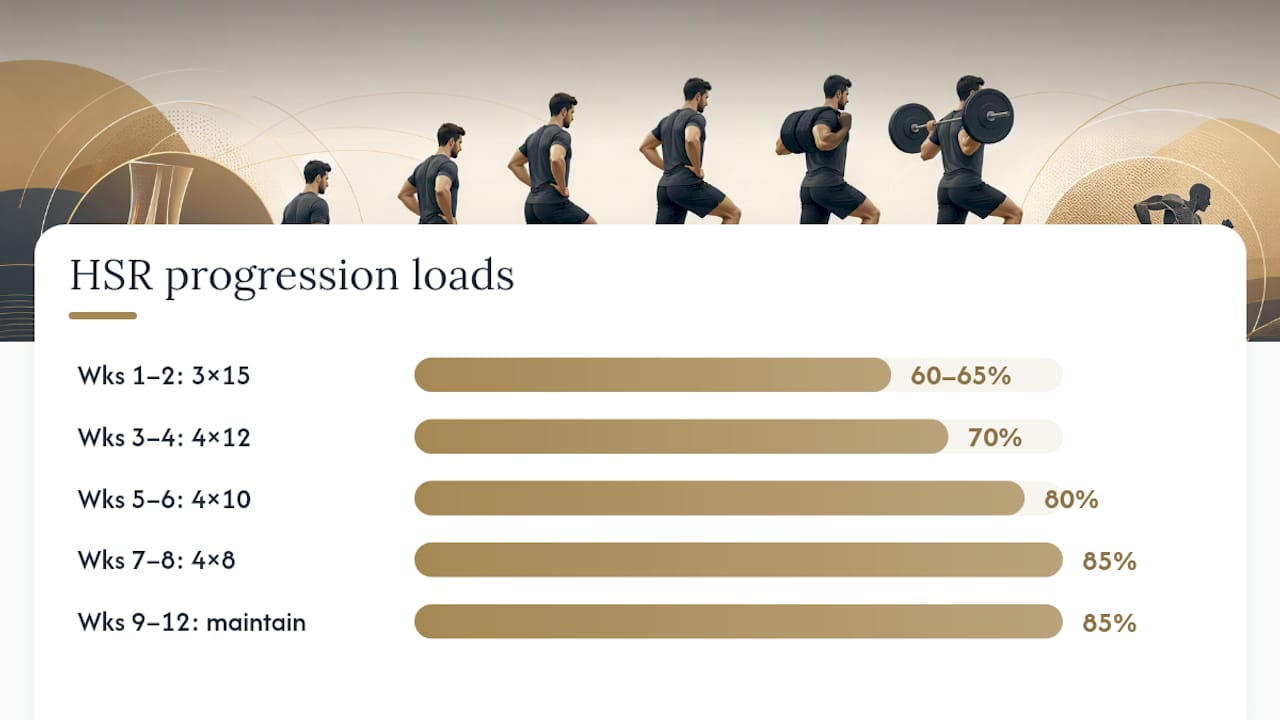
A practical 8 to 12 week progression:
Increase load only when you can complete all sets and reps with acceptable pain, generally at or below a 4 or 5 out of 10 during the set, and no meaningful flare the next day. If a machine isn’t available, dumbbells, a loaded backpack, or resistance bands anchored under the foot all work as substitutes for the leg-press or Smith machine versions.
HSR tends to suit people who already have gym access and are comfortable with progressive strength training language, sets, reps, percentages. Eccentric heel drops suit people who want a minimal-equipment, at-home routine. Neither is superior on outcomes. The systematic review evidence supports both eccentric and combined eccentric-concentric or HSR programs, with individualized, progressive loading being the actual common thread across successful rehab, not the specific protocol label.
Insertional tendinopathy needs a modified exercise setup because the standard heel-drop-below-a-step position compresses the tendon against the heel bone right where it’s already inflamed. The fix isn’t avoiding exercise. It’s choosing versions that keep the ankle out of deep dorsiflexion.
What to avoid: below-step eccentric heel drops, deep static wall calf stretches, and any drill that pushes the ankle into maximum dorsiflexion. These are common, well-intentioned recommendations for general calf tightness, but for an insertional Achilles problem they add direct compressive load exactly where you don’t want it.
A temporary heel lift inside your regular shoes can also help during the acute phase. Raising the heel slightly reduces the ankle’s resting dorsiflexion angle throughout the day, not just during exercise, which takes some load off the insertion during ordinary walking and standing.
Pro Tip: If you’ve been doing deep calf stretches for “tight Achilles” and your insertional pain has gotten worse, stop the stretching before you stop the strengthening. Stretching is usually the actual aggravator, not the loading exercises.
Temporary activity modification, meaning less hill running or stair work for a few weeks, paired with flat-ground strengthening, is typically enough to calm an insertional flare without full rest.
Progression in Achilles tendinopathy rehab comes down to one core skill: reading your pain accurately and adjusting load in response, rather than following a fixed calendar regardless of how your tendon feels.
The pain-monitoring model most clinicians use allows exercise-related discomfort up to roughly a 4 or 5 out of 10 during or immediately after a session. What matters more is the next morning: if stiffness and pain have returned to baseline within 24 hours, the loading was appropriate. If pain is worse the next day than it was the day before you started, or swelling has increased, that’s a signal to regress, drop weight, reduce reps, or add a rest day, not necessarily to stop entirely.
Set realistic expectations for timing. Early symptom relief, less morning stiffness, less pain on stairs, often shows up within two to four weeks of consistent loading. That is not the same as tendon remodeling, which reflects actual structural change in the collagen matrix and typically takes several months of consistent loading to develop fully. Feeling better in week three doesn’t mean you’re done. It means the program is working and needs to continue.
The most common pitfalls people run into: complete rest (which lets the tendon deteriorate further rather than protecting it), jumping straight into running or plyometrics because pain has improved, and ignoring proximal strength, meaning the calf, hamstring, and glute muscles that share load with the Achilles during activity.
The Achilles doesn’t work in isolation. Weakness or poor coordination anywhere up the kinetic chain, the calf complex, hamstrings, and glutes, forces the tendon to absorb load that should be shared across the leg. That’s part of why isolated calf raises sometimes plateau: the tendon is loaded correctly, but the rest of the chain isn’t pulling its weight.
Returning to running needs its own staged plan rather than a single “cleared to run” moment. A practical progression:
Rehab that skips this chain-based, staged approach and jumps straight from strength exercises to full training volume is where a lot of “successful” rehabs relapse. The tendon can tolerate the load in the clinic; the problem shows up three weeks later on the trail.
No two Achilles tendinopathy cases get exactly the same exercise prescription, and that’s by design, not inconsistency. A proper clinical assessment starts with locating the pain (midportion versus insertional), then moves through strength testing, single-leg calf raise endurance compared side to side, and a gait or running analysis to spot the compensations that may have contributed to the problem in the first place.
That assessment is what determines whether someone starts on isometrics, moves straight into eccentric loading, or needs an HSR program built around existing gym access. It also flags when the kinetic chain, hip or hamstring weakness, is quietly overloading the tendon regardless of how well the calf exercises are performed.
Exercise carries the rehab, but several in-clinic treatments are commonly used alongside it as adjuncts, not substitutes. Shockwave therapy is often used for tendinopathy that has been slow to respond to loading alone. Active Release Technique addresses soft-tissue restrictions in the calf that can limit how well a loading program progresses. Laser therapy is sometimes added for pain modulation in the early, high-irritability phase.
A typical assessment visit includes a movement and strength evaluation, palpation to confirm pain location, and a discussion of training history before any exercise plan is set. Same-day appointments are generally available for people who want that assessment before starting, or after weeks of self-directed exercise haven’t moved the needle.
A proper warm-up before Achilles-specific exercise isn’t about static stretching, which, as covered earlier, can actually aggravate insertional pain. Instead, spend five to eight minutes on light aerobic movement, brisk walking or a stationary bike at low resistance, to raise blood flow to the calf and tendon before any loading begins.
Follow that with a few sets of gentle, pain-free ankle pumps and light bodyweight calf raises, well below your working load, to prime the tendon for the heavier eccentric, isometric, or HSR work that follows. This isn’t the training stimulus itself. It’s rehearsal for the movement pattern.
After your working sets, cool down with slow, controlled ankle circles and light walking rather than jumping straight to a deep static stretch. If you have midportion tendinopathy and tolerate gentle stretching well, a light, pain-free calf stretch held for 20 to 30 seconds can be reasonable post-session. If you have insertional pain, skip the stretch altogether and stick to gentle movement instead.
Ice is optional and mostly a comfort measure rather than a healing accelerant; some people find 10 to 15 minutes of icing after a harder session reduces next-day stiffness, but it isn’t a required part of the routine. The consistent element that matters across both warm-up and cool-down is avoiding sudden, unprepared loading and avoiding deep stretching immediately after a heavy session, since the tendon is more reactive right after intense work.
The single most common mistake is rushing the eccentric tempo. Dropping the heel in under a second, rather than the prescribed three seconds, cuts the time the tendon spends under load and blunts the adaptation the exercise is supposed to produce.
The second is doing insertional-pattern stretches on an insertional injury. Deep wall calf stretches and below-step heel drops feel like they should help a “tight” Achilles, but for insertional cases they add compressive load exactly at the irritated attachment point.
A third mistake is chasing rep counts instead of pain response. Grinding through 180 daily reps despite rising pain, just because that’s the “official” protocol number, ignores the do-as-tolerated evidence showing flexible dosing works just as well and keeps people consistent longer.
Complete rest during a flare is another frequent misstep. Stopping loading entirely lets the tendon deteriorate rather than protecting it. Reducing volume or intensity, not eliminating exercise, is the correct response to a bad pain day.
Finally, many people skip the proximal strength work entirely, treating Achilles rehab as a calf-only problem. Weak glutes and hamstrings quietly shift more load onto the tendon during running and jumping, and skipping that piece is a common reason a seemingly complete calf program still doesn’t hold up once someone returns to sport.
Rehab exercises work best when they slot into a routine you’re already running, rather than competing with it. If you train five days a week, doing eccentric heel drops or HSR calf work on your regular strength or lower-body days, rather than trying to squeeze in a separate session, dramatically improves consistency.
For runners and field-sport athletes, the practical move is separating loading days from high-impact training days early in rehab, then gradually merging them back together as tolerance improves. A calf-loading session the morning of an easy run is generally fine once pain is well controlled; pairing heavy calf loading with a hard sprint or jump session on the same day, especially early in rehab, tends to overload the tendon.
Daily habits matter more than people expect. Standing calf raises can be done while brushing your teeth or waiting for coffee. Isometric holds fit easily into a work-from-home day, standing at a desk between calls. The goal isn’t more exercise time. It’s distributing the existing prescribed sets across the day in a way that fits your actual schedule, since three shorter sessions of isometric holds throughout a workday produce essentially the same benefit as one longer block.
For sport-specific integration, once strength phases are solid, start layering sport movement patterns back in gradually, cutting and change-of-direction drills for field-sport athletes, hill repeats for runners, rather than returning to full training volume in one step.
Every exercise protocol described here works reasonably well in the research. What separates a good outcome from a frustrating one is almost never the specific protocol you pick. It’s whether you actually do it, consistently, for long enough to matter.
I’d rather see someone commit to a do-as-tolerated eccentric program they’ll genuinely stick to for twelve weeks than a textbook 180-rep Alfredson protocol they abandon after ten days because it’s miserable. A simple daily log, sets, reps, and a quick pain rating, keeps you honest about progress and makes it obvious when it’s time to increase load rather than guessing.
Give symptom relief two to four weeks to show up, and give the tendon itself three to six months to actually remodel. Those are different timelines, and expecting tendon-level durability at week three sets you up to quit right when the program is starting to work.
If pain is worsening rather than settling, or you’re seeing swelling that doesn’t go down, that’s your cue to get a professional assessment rather than adjusting the program yourself indefinitely.
— Deane
Exercise carries most of the work in Achilles tendinopathy recovery, but a proper assessment first, confirming whether you’re dealing with midportion or insertional pain, checking strength side to side, and ruling out gait issues, saves you weeks of guessing which protocol to follow. Shephard Health builds individualized, evidence-based rehab plans around exactly that kind of biomechanical assessment, rather than handing every patient the same generic sheet of exercises.

When loading alone hasn’t moved the needle, or pain has been lingering longer than a few months, in-clinic adjuncts like shockwave therapy, Active Release Technique, and laser therapy can support a loading program that’s stalled. A visit typically starts with palpation, strength testing, and a discussion of your training history before any plan is set, and same-day appointments are generally available for people who want that clarity sooner rather than later. If you’ve been managing Achilles pain on your own without much progress, browse the full range of services and book an assessment to get a plan built around your actual tendon, not a generic protocol.
The exercise recommendations in this article draw on the 2024 clinical practice guideline for midportion Achilles tendinopathy, which frames tendon loading as first-line care. Dosing guidance for eccentric heel drops comes from the randomized trial comparing the standard Alfredson protocol with a do-as-tolerated version. Knee-position guidance during heel drops is based on a biomechanical modeling study of knee flexion effects on Achilles tendon load. Comparisons between eccentric and heavy slow resistance approaches draw on a systematic review of exercise types for Achilles tendinopathy. Readers dealing with pain-related fear or resistance to loading exercises may also find value in approaches to pain coping used in clinical settings.
This article is general information, not a substitute for advice from a qualified doctor. Consult a qualified healthcare professional about your own circumstances before acting on anything here.
There’s no true shortcut, but the fastest path to symptom relief combines isometric holds for immediate pain control with a consistent eccentric or heavy slow resistance program; most people notice reduced stiffness within two to four weeks of steady loading.
Yes, and you generally should. Complete rest tends to let the tendon deteriorate further, while controlled, progressive loading, exactly the eccentric, HSR, and isometric exercises described above, is the recommended first-line treatment.
Avoid complete rest, deep static calf stretches if you have insertional pain, below-step heel drops on an insertional injury, and pushing through sharp, escalating pain just to hit a fixed rep count.
A few standing isometric calf holds, 30 to 45 seconds each, or gentle ankle pumps and circles, can ease stiffness within minutes; skip deep static stretching if your pain is insertional, since it can compress the tendon at the heel bone.
Same Day Appointments Available
We Direct Bill!