

Kinesiology tape is a reasonable adjunct for mild-to-moderate ankle sprains, particularly in the sub-acute phase when swelling has begun to settle and your goal is to restore movement and proprioceptive feedback. A systematic review of seven studies found short-term pain relief is achievable, but KT tape does not replace a rigid brace for Grade 2–3 ligament injuries with mechanical instability. Here is what to do right now:
Stop and seek urgent care if you notice: severe swelling that worsens rapidly, inability to bear any weight, visible bone deformity, numbness or tingling in the toes, or skin that turns blue or white after taping.
Pro Tip: If this is your first time applying kinesiology tape, have a clinician walk you through the technique at least once. Correct anchor placement and tension matter far more than which brand you buy.
KT tape is most effective as a short-term adjunct for pain and gait during sub-acute ankle sprain recovery, not as a primary treatment or replacement for a brace in unstable Grade 2–3 injuries.
| Point | Details |
|---|---|
| Best timing for KT tape | Sub-acute phase (days 3–14) after swelling reduces; less effective over peak acute swelling. |
| Tension rule | Apply support strips at 30–40% stretch; always anchor the first and last 2 inches at 0% tension. |
| Evidence summary | Short-term pain relief and immediate gait improvements are supported; long-term functional advantage over other treatments is not clearly established. |
| Red flags to act on | Inability to bear weight, deformity, progressive numbness, or worsening swelling require urgent clinical evaluation, not taping. |
| Shephardhealth | Supervised taping, ART, laser therapy, and individualized rehab are available for ankle sprain recovery at Shephardhealth. |
The answer depends on injury grade and recovery phase. Kinesiology tape works best as a movement-permitting support, not a rigid stabilizer, so matching it to the right stage of healing is what determines whether it helps.
Indications where KT tape is appropriate:
Contraindications — do not apply KT tape if you have:
Acute phase (0–48 hours): Rigid support or a lace-up brace is generally more appropriate here. Swelling is at its peak, skin is often sensitive, and tape adhesion is unreliable. KT tape can be applied for lymphatic drainage purposes by a trained clinician, but self-application at this stage carries a higher risk of poor fit.
Sub-acute phase (3–14 days): This is where KT tape tends to show the clearest benefit. Research supports its use during this window for pain modulation and encouraging safe, guided movement rather than rigid immobilization.
Chronic instability: KT tape can provide proprioceptive reinforcement during sport and activity, but it works best alongside a progressive balance and strengthening program rather than as a sole intervention.
| Support type | Elasticity / stretch | Mechanical support level | Best for | Wear time |
|---|---|---|---|---|
| Kinesiology tape | High (approximately 30–40% stretch recommended) | Low to moderate | Proprioception, pain modulation, sub-acute rehab | 3–5 days |
| Rigid athletic tape | None | High | Acute instability, Grade 2–3 sprains, immediate post-injury | 1 session / 1 day |
| Semi-rigid lace-up brace | Low | Moderate to high | Mechanical instability, return-to-sport protection | Per activity |
The practical rule: use KT tape when your goal is to move better with feedback. Use a brace or rigid tape when your goal is to prevent movement in an unstable joint.
Getting the materials right before you begin saves you from a poor application that peels off mid-activity. Here is what to gather:
Technique precision matters more than brand selection, as KT Tape’s own clinical guidance acknowledges. That said, brands do differ in adhesive strength, elasticity, and skin tolerance, and those differences are worth knowing before you buy.
Kinesio Tex Gold (by Kinesio, the original brand) uses a wave-pattern acrylic adhesive designed to mimic skin elasticity closely. It is the tape used in most foundational clinical research and is a reliable first choice for rehab-focused applications.
KT Tape is widely available at U.S. pharmacies and sporting goods stores. The Pro version is synthetic and more water-resistant than the original cotton version, making it practical for athletes who train through recovery.
RockTape uses a stronger adhesive than most competitors and is favored by athletes who need tape to stay on through heavy sweating or water exposure. Its higher adhesive strength also means slightly more care is needed during removal.
TheraBand Kinesiology Tape is a mid-range option with good elasticity and a gentler adhesive, often chosen for patients with more sensitive skin or for clinical settings where tape is changed frequently.
CureTape is a European brand with strong U.S. distribution, commonly used in lymphatic taping protocols because of its consistent stretch properties and hypoallergenic adhesive options.
Pro Tip: After applying each strip, rub it firmly with your palm for 10–15 seconds. The friction generates heat that activates the acrylic adhesive and significantly improves how long the tape stays on.
The technique described here targets the anterior talofibular ligament (ATFL) and calcaneofibular ligament (CFL), the two structures most commonly injured in an inversion sprain. Sit with your foot hanging freely off a table or chair, ankle held at 90 degrees (neutral dorsiflexion).
Safety reminder: Stop immediately if you feel increased pain, notice your toes turning blue or white, or experience pins and needles during or after application.
Cut a strip approximately 10–12 inches long.
Tear the backing at the center and apply the midpoint of the strip just below the lateral malleolus (the bony bump on the outside of your ankle) with zero stretch.
Lay both ends down the sides of the ankle with no tension, pressing firmly.
Cut a Y-strip or a straight strip approximately 14–16 inches long.
Anchor the tape at the base of the 5th metatarsal (the bony prominence on the outer edge of your foot) with 0% stretch for the first 2 inches.
Apply 30–40% stretch as you pull the strip up and over the lateral malleolus, following the path of the ATFL toward the anterior fibula.
Lay the final 2 inches down with 0% stretch to complete the anchor.
Cut a straight strip approximately 10 inches long.
Anchor at the medial calcaneus (inner heel) with 0% stretch.
Apply 30–40% stretch as you pull the strip under the heel and up the lateral side toward the fibula.
Finish with 0% stretch at the proximal end.
Finishing check: Stand and take a few steps. The tape should feel supportive but not restrictive. You should have full dorsiflexion range. If any strip feels tight or causes tingling, remove it and reapply with less tension.
This method, used in the ankle balance taping RCT that showed immediate improvements in gait velocity, step length, and stride length, is particularly useful during sub-acute rehab and return-to-sport phases.
Stage 1: Posterior talar glide strip
This strip addresses posterior talar mobility restriction common after inversion sprains.
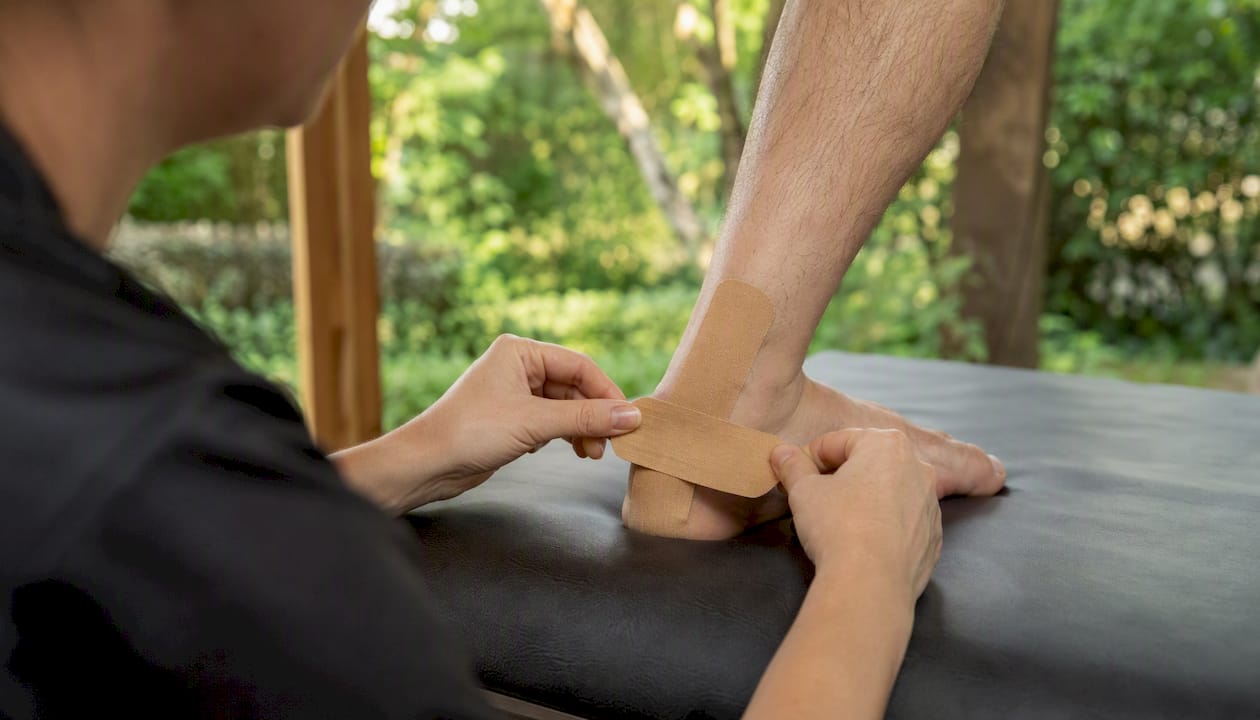
Stage 2: Inversion-control strip
Follow the same path as Strip 2 in the standard technique above.
Stage 3: Eversion-support strip (with overlap)
Apply moderate stretch as you pull medially under the arch and up the medial ankle. This strip overlaps the inversion strip at the calcaneus, creating a cross-pattern that improves overall ankle balance.
Stage 4: Reinforcement strip
Double-strip reinforcement increases inversion resistance without eliminating motion.
Stretch the strip until it is about one-third longer than its resting length, then back off slightly. That is your working range. Pulling to maximum stretch is one of the most common errors and can cause skin irritation or restrict circulation.*
Not every ankle taping application has the same objective. The strips you use, and how you apply them, should match what you are trying to achieve.
Cut a wide strip into 4–5 thin tails, anchor the uncut end proximal to the swelling, and fan the tails over the edematous area toward lymph nodes. This technique is most appropriate between days 2 and 7 post-injury when swelling is present but the skin is intact. It is not a substitute for compression or elevation in the acute phase.
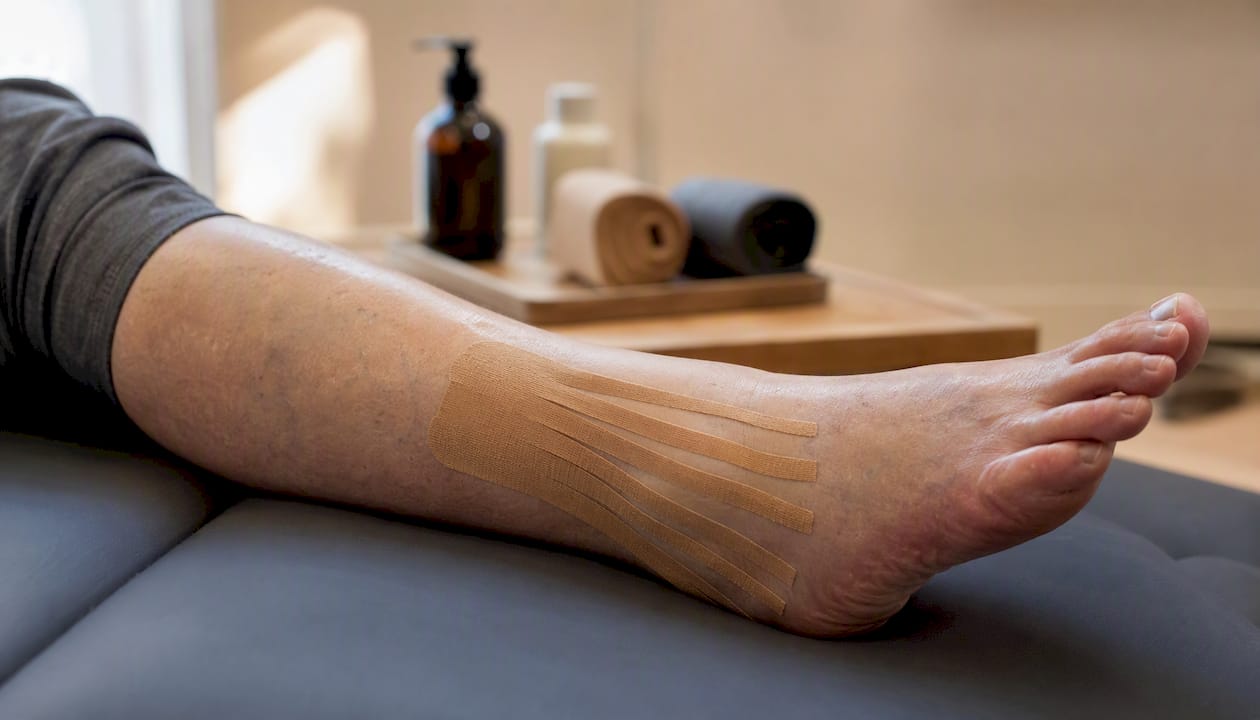
For patients managing long-term lateral instability, the focus shifts to proprioceptive reinforcement rather than acute pain control. Apply the ankle balance taping method with double-strip reinforcement on the inversion-control strip. The meta-analysis on chronic ankle instability found moderate effects on gait function and some range-of-motion measures, supporting repeated taping during activity-heavy periods. Pair this with a reactive neuromuscular training program for the most durable outcome.
The goal is proprioceptive priming rather than structural support, so the tape can be lighter and is typically replaced after each session rather than worn for multiple days. For athletes returning to field sports, pairing KT tape with a lace-up brace during the first 4–6 weeks of return-to-play provides complementary protection: the brace handles mechanical stability while the tape maintains sensory feedback. A mobility restoration checklist can help you track readiness before stepping down from brace-plus-tape to tape alone.
The typical wear window is 3–5 days. Adhesion begins to weaken after that point, and leaving tape on longer than 5–7 days increases the risk of skin maceration and irritation. Replace the tape sooner if you notice any of the following:
Allow at least 30 minutes after application before swimming or heavy exercise. The adhesive needs time to bond fully with the skin. When showering, pat the tape dry with a towel rather than rubbing it. Avoid soaking in a bath or hot tub, as prolonged water exposure weakens the adhesive significantly faster than a brief shower.
Aftercare do’s and don’ts:
KT tape is a low-risk intervention, but certain presentations require clinical assessment before any taping or self-treatment begins.
Contraindications requiring clinical review before taping:
Red flags requiring urgent evaluation:
The Ottawa Ankle Rules are a well-validated clinical decision aid used by emergency physicians and clinicians to determine when imaging is needed after an ankle injury. They are not a replacement for hands-on assessment, but they provide a useful reference point: if you have bony tenderness at the posterior edge of the fibula, the tip of the lateral malleolus, or the base of the 5th metatarsal, and you cannot bear weight for four steps, imaging is recommended.
If your ankle sprain is not improving after 7–10 days of conservative care, if you experience recurrent sprains on the same ankle, or if you feel persistent instability during normal walking, a clinical assessment at Shephardhealth will identify whether you need supervised taping, soft tissue treatment, or a structured rehab program.
The honest summary: kinesiology tape offers real short-term benefits for pain and immediate gait function, but the evidence for long-term structural recovery is limited. It is an adjunct, not a primary treatment.
Key findings from the research:
What the evidence tells you: KT tape is most defensible as a short-term pain and mobility aid during sub-acute recovery. The proprioceptive and gait benefits are real but immediate; the evidence does not support using tape as a substitute for progressive rehabilitation.
Limitations of the current evidence:
Technique heterogeneity is the biggest confounder across studies. Trials use different strip configurations, tension levels, and application sequences, making direct comparison difficult. Sample sizes in several RCTs are small, and follow-up periods rarely extend beyond 72 hours to two weeks. These gaps mean the evidence supports using KT tape as part of a broader rehab strategy, not as a standalone protocol with predictable long-term outcomes.
| Study type | Intervention | Primary outcome | Short-term result |
|---|---|---|---|
| Systematic review (7 studies, 247 patients) | KT tape vs. control for acute ankle sprain | Pain, function, edema | Short-term pain relief possible; no consistent long-term functional advantage |
| Quasi-randomized ED trial | KT + conventional care vs. conventional care alone | Analgesic use, patient satisfaction | Reduced analgesic use; higher satisfaction; pain difference not sustained at later follow-up |
| Randomized crossover RCT | Ankle balance taping vs. placebo vs. no tape | Gait velocity, step length, stride length | Significant immediate gait improvements |
| Meta-analysis (chronic ankle instability) | KT tape in athletes with CAI | Gait function, ROM | Moderate effects on gait; limited effects on dynamic balance |
For a deeper look at how the broader evidence base for kinesiology tape is interpreted clinically, Shephardhealth’s evidence review provides useful context alongside the primary research.
The difference between a taping application that holds for five days and one that peels off in two hours usually comes down to a handful of technique details that are easy to overlook.
Common application mistakes:
Hold the strip at both ends at resting length. That is your working range. For a 10-inch strip, you are looking for approximately 13–13.5 inches of applied length. Pre-cutting strips to standard lengths for your foot size (measure once, cut a template) removes guesswork from repeated applications.
When to use double-strip reinforcement:
Double strips are appropriate when a single inversion-control strip provides insufficient feedback during lateral cutting movements or when the patient reports the tape feels “too loose” during sport. Apply the second strip directly over the first using moderate tension and the same anatomical path.
Tape alone does not rebuild the proprioceptive and strength deficits that make re-sprain so common. A practical progression looks like this:
At Shephardhealth, a clinical assessment identifies exactly where you are in this progression and builds an individualized plan around it. The clinic’s kinesio taping services include supervised application teaching so you can replicate the technique correctly at home.
There is a tendency in both clinical and consumer spaces to either oversell kinesiology tape as a near-magical recovery tool or dismiss it entirely because the long-term evidence is modest. Neither position is particularly useful.
What the research actually supports is more nuanced: KT tape provides a real, short-term sensory and mechanical input that can reduce pain, improve gait, and help patients move more confidently during the sub-acute phase of recovery. Those are meaningful benefits when the alternative is guarded, painful movement that delays return to function. The proprioceptive signal the tape provides, through cutaneous stimulation of the skin overlying the lateral ankle, is not a placebo effect in the studies that have measured gait outcomes directly.
Where the evidence falls short is in demonstrating that tape alone produces better long-term outcomes than a well-structured rehab program without tape. That gap is not a reason to avoid KT tape. It is a reason to use it as part of a broader strategy rather than as a substitute for one. The patients who benefit most are those who use tape to move better during rehab, not those who use it to avoid rehab altogether.
If you are unsure whether your injury warrants tape, a brace, or a clinical assessment, err on the side of getting it assessed. A single visit to confirm the injury grade and rule out fracture or ligament rupture is worth far more than weeks of self-managed care that misses the underlying problem.
Taping at home is a practical first step, but persistent instability, recurrent sprains, or a Grade 2–3 injury with significant ligament involvement call for more than a roll of tape and a YouTube tutorial.

Shephardhealth offers supervised kinesio taping sessions where you learn the correct technique for your specific injury pattern, not a generic protocol. Beyond taping, the clinic provides Active Release Technique to address scar tissue and restricted soft tissue around the ankle, laser therapy to support tissue healing, and individualized balance and strength rehab programs designed around your recovery timeline and activity goals. Direct insurance billing is available, and same-day appointments mean you are not waiting weeks to get assessed.
If your ankle is not improving after 7–10 days of conservative care, or if this is a repeat sprain on the same side, book an assessment at Shephardhealth’s sports injury clinic and get a clear picture of what your ankle actually needs.
The studies below are the primary evidence sources referenced throughout this article. When reading any clinical trial, check for three things: whether there was a control group, how many participants were enrolled, and how long follow-up lasted. Those three factors determine how much weight to give the findings.
Same Day Appointments Available
We Direct Bill!